There’s something almost sacred about the ritual of making homemade pasta from scratch. The feel of flour between your fingers, the gentle rhythm of kneading, the anticipation as golden strands come together—it’s more than cooking. It’s an act of love that transforms simple ingredients into something that nourishes both body and soul. As someone who’s spent countless Saturday afternoons elbow-deep in dough, I can tell you that making fresh pasta at home requires just flour, eggs, and about 90 minutes of your time, but the rewards extend far beyond dinner.
This comprehensive guide will walk you through every step of the pasta-making process, from selecting your ingredients to troubleshooting common issues. Whether you’re drawn to this craft as part of embracing the estilo de vida tradwife or simply want to elevate your homemaking skills, you’ll discover that homemade pasta isn’t just achievable—it’s genuinely enjoyable.

Why make pasta from scratch?
Before we dive into the how, let’s talk about the why. Making pasta from scratch connects you to generations of women who’ve nourished their families with their own hands. It’s a skill that embodies self-sufficiency and intention—two cornerstones of traditional homemaking.
Fresh pasta has a tender, delicate texture that dried varieties simply can’t match. The flavor is cleaner, more refined, and it absorbs sauces beautifully. Beyond the culinary benefits, there’s something deeply satisfying about creating food from its most basic elements. No preservatives, no mysterious ingredients—just simple, wholesome staples you can pronounce.
I remember the first time my husband tasted my homemade fettuccine. His expression said everything—this wasn’t just different from boxed pasta, it was transformative. That moment reinforced why I’d chosen to invest time in organizing my kitchen to make these traditional cooking methods part of our regular rhythm.
Essential ingredients for homemade pasta
The beauty of pasta-making lies in its simplicity. You need just three core ingredients: all-purpose flour, eggs, and salt. That’s it. No specialty items, no expensive imports—though you can certainly experiment as you gain confidence.
For the flour, standard all-purpose works wonderfully for beginners. The ratio I’ve settled on after years of trial is roughly two cups of flour to three large eggs for a family-sized batch. If you want more authentic Italian texture, blend in some semolina flour—about one part semolina to three parts all-purpose creates that signature toothsome bite.
Eggs are where quality truly matters. Farm-fresh eggs with deep golden yolks produce pasta with richer color and superior flavor. I try to source mine from a local farm stand, but good-quality supermarket eggs work perfectly fine. The fresher the egg, the easier your dough will come together.
Some recipes include olive oil, and while it’s not strictly necessary, a tablespoon can make the dough slightly more forgiving to work with. I typically add it when I’m teaching someone new or when the kitchen humidity is particularly low.

Tools you’ll need (and what you can skip)
Pasta-making doesn’t require a kitchen full of gadgets. In fact, Italian grandmothers have been rolling perfect pasta with nothing but a wooden pin for centuries. That said, a few tools make the process smoother, especially when you’re just starting out.
Essential tools:
A large, clean work surface is non-negotiable—wood or marble are traditional choices, but any clean countertop works. You’ll need a fork for the initial mixing, a bench scraper to help gather the dough, and a sharp knife or pizza cutter for cutting your pasta shapes.
Optional but helpful:
A pasta machine is the upgrade that changed everything for me. Hand-rolling produces beautiful results, but a manual pasta machine gives you consistent thickness with far less arm fatigue. The basic models cost around forty dollars and last for decades. If you make pasta more than occasionally, it’s worth the investment.
A drying rack helps if you’re making pasta ahead, though I often just drape mine over the back of a clean chair or lay it on tea towels. Some women in our comunidad have gotten creative with wooden clothes-drying racks repurposed for pasta.
Step-by-step: Making the perfect pasta dough
Now we get to the heart of it. This is where flour becomes something magical, and where you’ll develop an intuitive feel for the dough. Don’t worry if your first attempt isn’t perfect—pasta-making improves dramatically with practice.
Creating the flour well
Mound your flour directly on your work surface. Using your fingers, create a wide well in the center—think of it as a volcano crater. This well needs to be large enough to hold your eggs without them immediately spilling over the edges. The first few times, I was too timid with my well size and ended up chasing runaway egg across the counter. Make it bigger than you think necessary.
Incorporating the eggs
Crack your eggs into the well and add a generous pinch of salt. Using a fork, beat the eggs gently, then begin pulling in flour from the inner walls of your well. Work slowly and deliberately—this isn’t a race. Gradually incorporate more flour, moving in small circles, until the mixture becomes too thick to stir with a fork.
This phase requires patience. If you rush and break through the flour wall, you’ll have egg running everywhere. Ask me how I know. The key is maintaining that barrier while slowly integrating the flour.

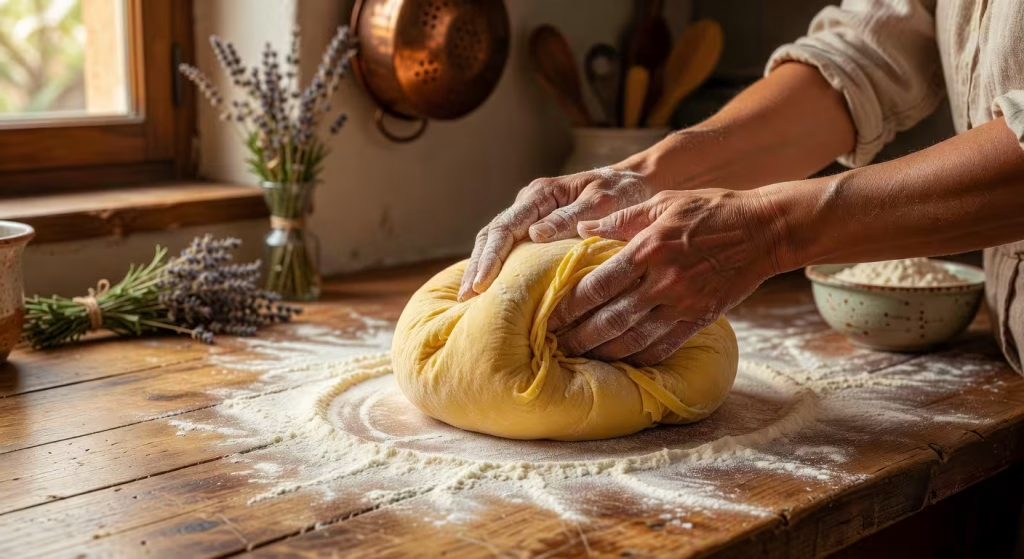
The kneading process
Once the mixture is too thick for the fork, it’s time to get your hands involved. Push the shaggy dough together and begin kneading. Proper kneading takes about ten minutes of consistent work—push the dough away with the heel of your hand, fold it back over itself, turn it a quarter turn, and repeat.
This is meditative work. I often use this time to pray or simply clear my mind. The dough will transform from rough and irregular to smooth and silky. You’ll feel it become more elastic and supple. When you press a finger into it, the dough should spring back slightly.
If your dough feels too dry and won’t come together, wet your hands slightly and continue kneading. If it’s sticky, dust with more flour. The ideal texture is smooth, pliable, and just barely tacky—similar to a baby’s skin, as my grandmother used to say.
The crucial rest period
Wrap your dough ball tightly in plastic wrap and let it rest at room temperature for at least thirty minutes. An hour is even better. This rest allows the gluten to relax, making the dough much easier to roll out. I learned this lesson the hard way when I skipped this step once because I was in a hurry—the dough fought me every inch of the way and the final pasta was disappointingly tough.
Use this resting time wisely. Prep your sauce, tidy your workspace, or start setting the table. This natural pause in the process fits beautifully into a well-planned day, much like the intentional rhythms we discuss in our guide to principios tradwife.
Rolling and shaping your pasta
After your dough has rested, it’s time to transform it into actual pasta. This is where the magic really happens, where that smooth ball becomes delicate sheets or rustic ribbons.
Using a pasta machine
If you’re using a manual pasta machine, divide your dough into four pieces and keep the portions you’re not working with covered. Flatten one piece into a rough rectangle and dust both sides lightly with flour.
Set your machine to its widest setting—usually marked as number one. Feed the dough through, then fold it into thirds like a letter. Run it through again. Repeat this folding and rolling process three or four times. This step, called laminating, creates the structure that gives your pasta that perfect texture.
Now begin reducing the thickness. Move the dial one setting at a time, running the dough through each setting twice. How thin you go depends on what you’re making—for fettuccine or tagliatelle, I usually stop at setting six or seven. For delicate ravioli or lasagne, you might go all the way to eight or nine, where the dough becomes almost translucent.

Hand-rolling pasta
No machine? No problem. Our great-grandmothers managed just fine with a rolling pin, and you can too. It just requires more elbow grease and patience.
Work with one quarter of the dough at a time. On a lightly floured surface, use a long rolling pin to roll from the center outward, rotating the dough frequently to maintain an even thickness. Your goal is a sheet thin enough that you can see your hand through it when you hold it up to the light.
This method builds arm strength and connects you to centuries of tradition. There’s something beautifully grounding about using these simple, time-tested techniques. For more ways to incorporate traditional methods into modern homemaking, you might enjoy our collection of fermentation recipes that similarly honor slow, intentional food preparation.
Cutting and shaping
For ribbon pasta like fettuccine or tagliatelle, lightly dust your pasta sheet with flour, then loosely roll it up like a sleeping bag. Using a sharp knife, cut crosswise into ribbons—about a quarter-inch wide for fettuccine, slightly narrower for tagliatelle. Unroll the ribbons immediately and toss them gently to separate.
If your machine has a cutting attachment, feed your sheets through for perfectly uniform noodles. I often do half by hand and half with the cutter—the slight irregularity of hand-cut pasta has its own rustic charm.
For shapes like ravioli or tortellini, keep the sheets flat and work quickly before they dry out. Simple squares or circles work wonderfully for beginners. Don’t attempt complicated shapes on your first try—master the basics first, then experiment.
Cooking fresh pasta to perfection
Fresh pasta cooks completely differently than dried, and this catches many first-timers off guard. Fresh pasta cooks in just 2-4 minutes, versus the 8-12 minutes needed for dried pasta. Blink and you’ll miss it.
Bring a large pot of water to a rolling boil. Salt it generously—the water should taste like the sea. This is your only chance to season the pasta itself, so don’t be shy. I use about a tablespoon of salt per gallon of water.
Add your pasta and stir immediately to prevent sticking. Set a timer for two minutes and test a strand. You’re looking for al dente—tender but with a slight resistance when you bite. Fresh pasta goes from perfect to overdone in seconds, so stay attentive.
Before draining, reserve a cup of the starchy cooking water. This liquid gold helps bind your sauce to the pasta and adjust consistency. I cannot stress enough how many times that pasta water has saved a dish that seemed too dry.
Sauce pairing and serving suggestions
Fresh pasta deserves a sauce that honors its delicate nature. Heavy, thick sauces can overwhelm it. I’ve found that simpler preparations work best—they let the pasta’s flavor and texture shine.
A classic butter and sage sauce is criminally simple yet elegant. Melt butter in a pan until it begins to brown slightly, add fresh sage leaves, toss in your pasta with a splash of cooking water, and finish with grated Parmesan. The entire sauce takes less time than cooking the pasta.
Light tomato sauces work beautifully—think fresh cherry tomatoes barely cooked with garlic and basil, rather than long-simmered marinara. Cream-based sauces should be delicate, enriched with pasta water rather than being overly thick.
For a truly minimalist approach, try aglio e olio—just olive oil, garlic, red pepper flakes, and parsley. It’s the weeknight dinner I return to again and again when I want something satisfying but don’t have much time. You can find more streamlined meal ideas in our guide to homemade condiments and sauces that pair wonderfully with fresh pasta.
Serve family-style on a large platter. Let everyone help themselves, passing bowls of grated cheese and crushed red pepper. This communal approach to dining fosters connection and gratitude—values at the heart of traditional homemaking.
Troubleshooting common pasta problems
Even experienced pasta makers encounter issues. Here’s how to solve the most common problems you’ll face.
Dough too dry and crumbly: This happens more often in winter when indoor humidity is low. Wet your hands and knead moisture in gradually, or next time add a touch more egg or a tablespoon of water to your initial mix.
Dough too sticky: Dust your work surface and the dough itself with more flour. Some days the dough just needs more flour than others—eggs vary in size, humidity fluctuates. Trust your hands more than strict measurements.
Pasta sticking together: Make sure you’re dusting adequately with flour as you cut. If laying pasta out to dry, ensure the strands aren’t touching. I learned to hang long pasta over a broomstick balanced between two chairs when making large batches.
Tough, chewy texture: You either didn’t knead long enough initially or skipped the resting period. Both steps are essential for developing the right gluten structure. There’s no shortcut here.
Pasta falling apart when cooking: Your dough may have been too dry, or you rolled it too thin for the shape you were making. Delicate sheets work for filled pasta, but ribbons need a bit more substance.
Storing and preserving homemade pasta
Fresh pasta doesn’t keep as long as dried, but you have several options for making it ahead.
Same-day use: Freshly made pasta can sit at room temperature for a few hours if you’re cooking it that evening. Just dust it well with flour and arrange in loose nests on a parchment-lined tray.
Refrigeration: Place your pasta in an airtight container with plenty of flour to prevent sticking. It will keep for up to two days. The texture may be slightly less tender than same-day pasta, but it’s still far superior to dried.
Freezing: This is my favorite method for batch cooking. Arrange pasta in a single layer on a baking sheet and freeze until solid, then transfer to freezer bags. Frozen pasta cooks directly from frozen—no thawing needed. Just add an extra minute to the cooking time.
Drying completely: If you want to create your own dried pasta, hang the noodles until completely brittle and moisture-free, which can take 12-24 hours depending on humidity. Store in airtight containers. Homemade dried pasta won’t last as long as commercial versions, so use within a month.
Variations and flavor experiments
Once you’ve mastered basic pasta, the variations become endlessly fun. I’ve experimented with everything from herbs to vegetable purées, and each brings its own character.
Herb pasta: Knead finely minced fresh herbs directly into your dough. Basil, parsley, or chives all work beautifully. Use about two tablespoons of herbs per batch.
Spinach or beet pasta: Purée cooked spinach or roasted beets and reduce the liquid by half on the stovetop. Use about a quarter cup of purée and reduce your eggs by one. The color is stunning, and it adds subtle flavor and nutrients.
Whole wheat pasta: Substitute half the all-purpose flour with whole wheat. You’ll need slightly more moisture, and the texture will be heartier. It pairs wonderfully with robust sauces.
Squid ink pasta: For a dramatic presentation, add a teaspoon of squid ink to your eggs. This creates jet-black pasta that’s stunning with simple white sauces.
The key with all variations is adjusting moisture content as needed. Different additions affect how much flour the dough requires, so trust your judgment and the feel of the dough more than exact measurements.
Making pasta-making a family tradition
One of the greatest joys of mastering this skill is passing it on. Pasta-making is wonderfully suited to involving children—the sensory experience, the visible transformation, the immediate reward.
Even toddlers can help crack eggs or dust the counter with flour. Older children can learn to knead and operate the pasta machine under supervision. My niece, at seven, can now roll and cut pasta with minimal help. The pride on her face when she serves pasta she made herself is priceless.
These moments become memories. Years from now, your children will remember Saturday afternoons making pasta together, flour everywhere, laughing over misshapen ravioli. They’ll carry these skills into their own homes, creating an unbroken thread of tradition and competence.
This is heritage in action—not just recipes passed down, but values, time together, and the confidence that comes from creating something real with your own hands. It’s part of what makes homemaking not just work, but a calling worth celebrating.
If you’re looking to deepen your connection to traditional foodways and connect with others on the same journey, I’d love to have you join our boletín informativo where we share seasonal recipes, homemaking tips, and encouragement for living intentionally. There’s also a wonderful group of women sharing their pasta successes and experiments in our foro de la comunidad—it’s the support and inspiration I wish I’d had when I was just starting out.
Preguntas frecuentes
What’s the best flour for making pasta from scratch?
All-purpose flour works perfectly for beginners and produces tender, delicious pasta. For more authentic Italian texture with a bit more chew, try blending three parts all-purpose with one part semolina flour. Avoid bread flour, which has too much protein and will make your pasta tough.
Can I make pasta without eggs for dietary restrictions?
Yes, you can create eggless pasta using just flour and water, though the texture will be slightly different—denser and less rich. Use about one cup of water per two and a half cups of flour, adding it gradually until the dough comes together. Knead longer than you would egg pasta to develop sufficient gluten.
How do I keep homemade pasta from sticking together?
Dust your pasta generously with flour immediately after cutting and toss the strands to separate them. If storing before cooking, arrange in loose nests or hang over a rod with space between strands. When cooking, use plenty of boiling water and stir right after adding the pasta to the pot.
Is a pasta machine really necessary or can I use a rolling pin?
A rolling pin works perfectly fine, especially for rustic pasta styles. Generations of Italian cooks made beautiful pasta with nothing but a wooden pin. A machine simply makes the process faster and achieves more consistent thickness, which is helpful but not essential. Start with what you have and upgrade if you find yourself making pasta regularly.
How long can I store homemade pasta before cooking?
Fresh pasta keeps in the refrigerator for up to two days in an airtight container dusted with flour. For longer storage, freeze it in a single layer on a baking sheet until solid, then transfer to freezer bags—it will keep for up to three months. You can also dry it completely and store like commercial pasta, though it won’t last quite as long.
Why did my pasta turn out tough instead of tender?
Tough pasta usually results from insufficient kneading or skipping the rest period. The dough needs about ten minutes of kneading to develop proper gluten structure, then at least thirty minutes of rest to relax. Overcooking can also create a tough texture, so watch your fresh pasta carefully—it cooks in just 2-4 minutes.
Lecturas adicionales: Para más contexto, consulta Pasta history and types on Wikipedia for background on the history of pasta.